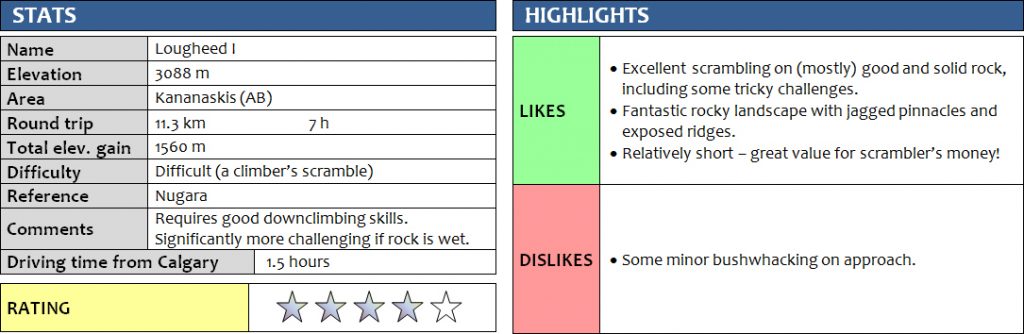
10 September 2017
With Vern
Sometimes the best trips are those you know the least about before you head out. When Vern made the somewhat spontaneous suggestion to ascend Lougheed I, I have to admit I knew precious little about the mountain. I basically had no expectations, and in retrospect this was a wonderful thing because the trip turned out to be a terrific surprise. Lougheed I may not be the true summit of Mount Lougheed (that honour goes to Lougheed II), but it is a fantastic scramble well worth the trip in my opinion.
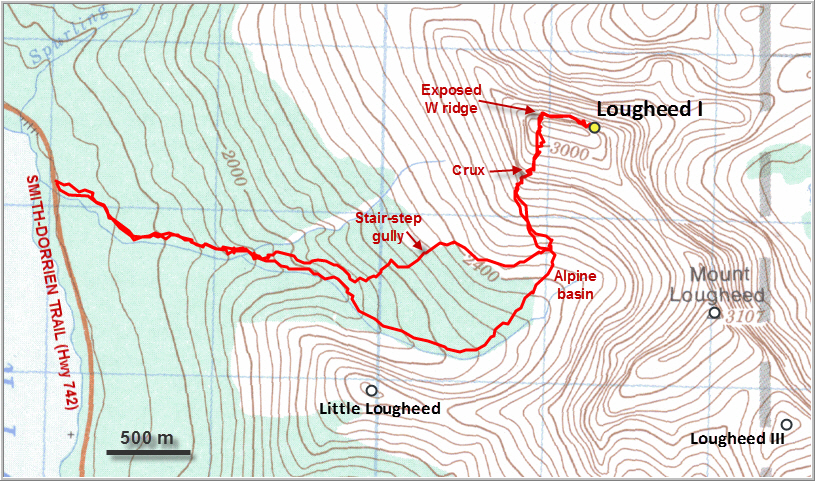
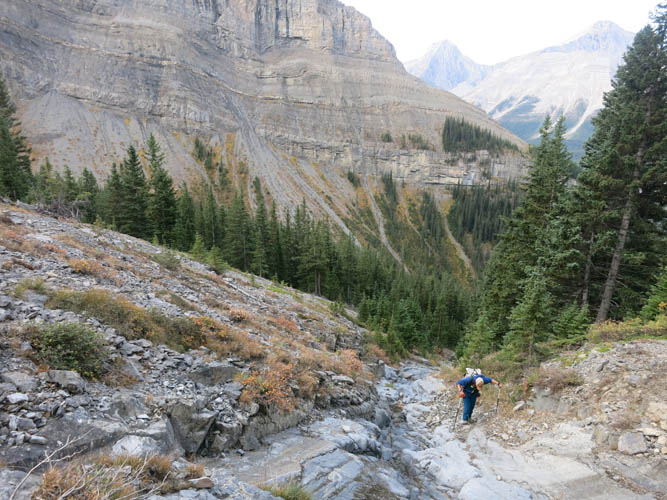
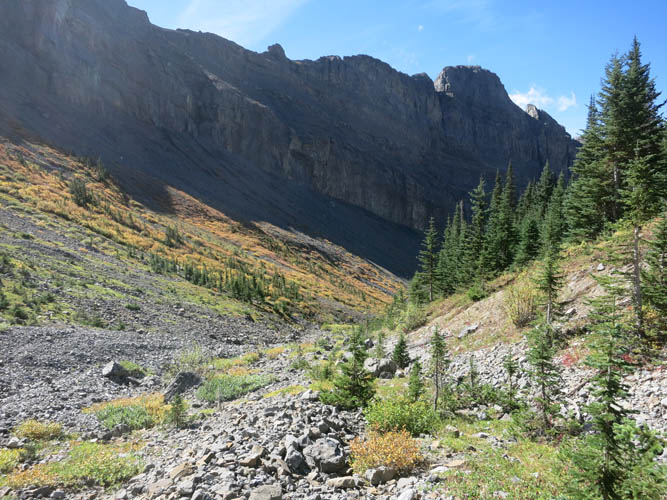
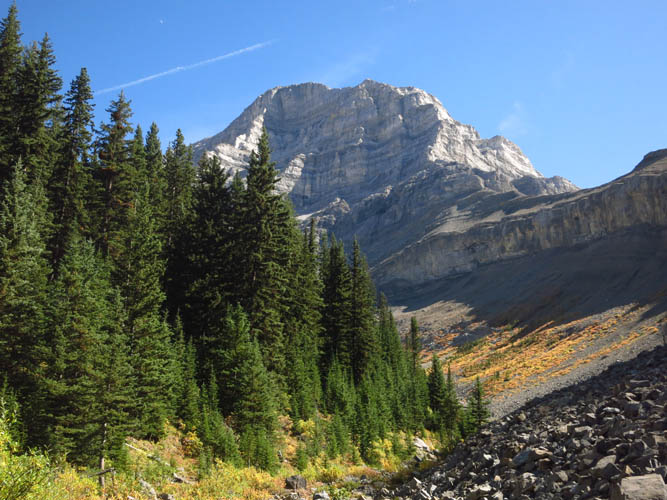
Several routes have been described and published by Nugara, soistheman.com, trailpeak.com, etc., and they all involve following an unnamed creek with variable amounts of light bushwhacking for the first couple of hours before you emerge out of the trees into a lovely alpine basin below the peaks of Lougheed I and II. We initially followed the published route and stayed near the creek bed on the left (north) side, but later ended up gaining some height to avoid a gully that came in from the left and some steep rocky slopes. As a result, we had to do some sidesloping through the forest high above the creek, while on return we realized we could’ve easily stayed in the creek itself, which isn’t difficult to navigate with the exception of a few short sections where the bush gets a bit thick.
Vern made quick work of the sidesloping business through the forest, while all I had to do was follow his long strides and try to keep up! We soon came across a small stair-step drainage – a welcome change of terrain and somewhat of a relief. The drainage was almost like a staircase that allowed us to gain elevation quickly on nice, solid rock. We made excellent time here as we tramped up the gully all the way to treeline, where we turned right and hiked over gently sloping meadows towards the start of the SW ridge.
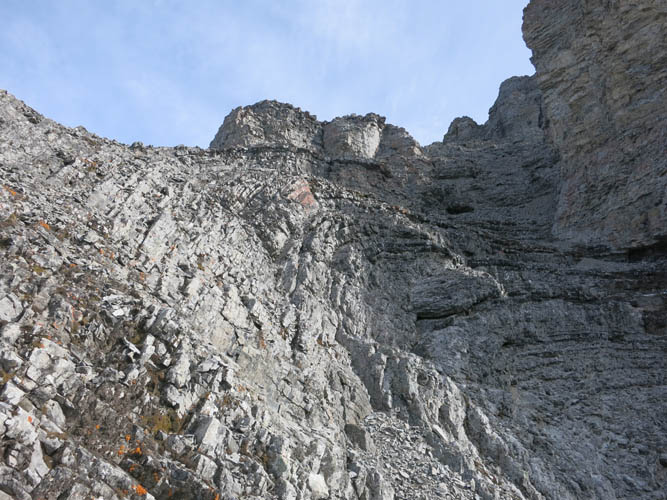
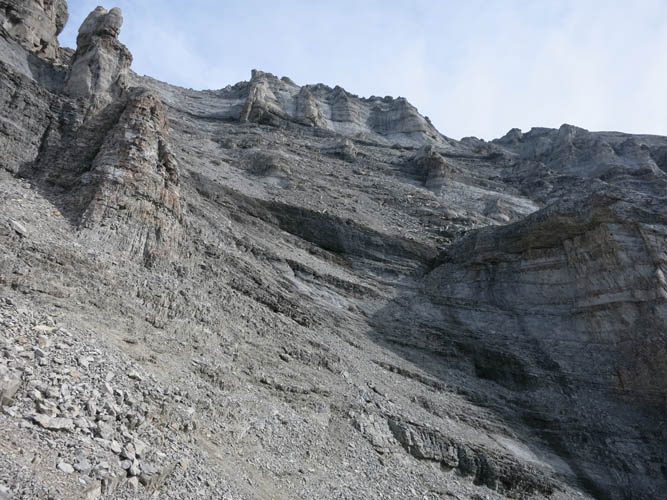
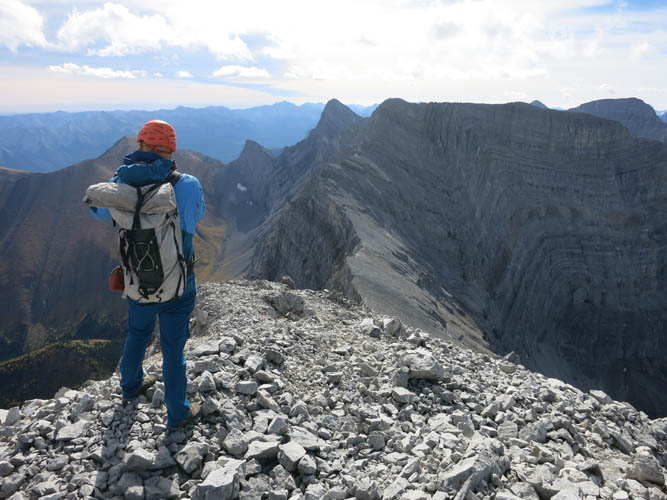
There’s a lot of loose rubble to trudge up at the beginning of this ridge, but by either staying on the ridge crest (Vern’s route) or in a small rocky gully (my choice) the tedium of treadmill scree can be reduced to a minimum. The views also get so much better here, in fact this is where the landscape really starts to change with dramatic vertical rock faces and pinnacles showing up the higher you go. About half way up the SW ridge, the route suddenly comes to a halt at a craggy cliff. Cairns point the way, and there seems to be only one way: up a short vertical step and into a narrow gully – the crux. It looks pretty difficult at first, but once you’re close to the rock and break it down, it’s much easier – in fact, it’s very enjoyable. The rock is firm and holds are plentiful, while exposure is limited, but of course a fall here could still get you injured badly. In our eagerness to get up there, we completely forgot to put on our helmets, a mistake we made sure not to repeat on the way down. After three to four moves in full concentration, we were up and over and continued following the now frequent cairns into the upper bowl. There was even a faint trail that had developed here and there; we both figured it must be the “Nugara effect”, and one can only assume that the “Vern effect” will make this trail even more pronounced! J
The upper bowl consists of steep grey slabs of rock on the sides and a mix of slabs, ledges and rubble in the middle, which was the easiest and most obvious route up. Nonetheless, we were both surprised how much elevation we still had ahead of us – this definitely isn’t a small mountain!
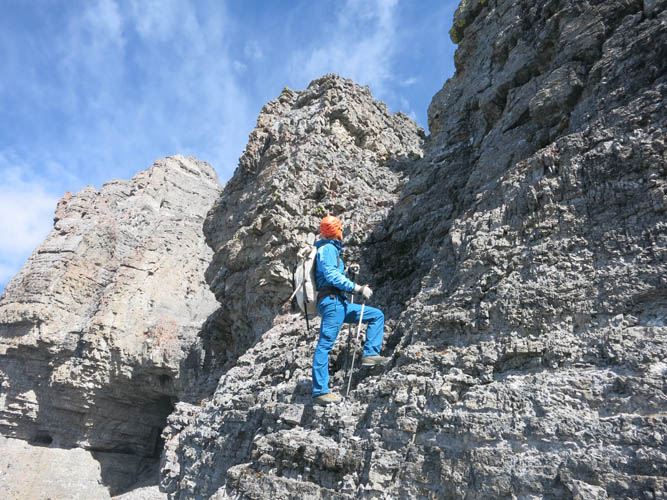
We eventually reached the west ridge, which offers some delicate and airy scrambling along its short but in places very exposed crest. This is probably the second crux of the trip, particularly the one spot where a smooth angled slab has to be upclimbed (and later downclimbed) by way of small, but conveniently located natural holes and steps in the rock. It’s either frightening if you’re not used to this kind of terrain, or a fun challenge if you enjoy difficult scrambling.
Past the exposed part of the west ridge, the remainder of the route was pretty straightforward on a decent trail. From a first high point the trail loses a bit of elevation, bypassing some jagged rock outcrops on the right, before leading up easy scree to the summit of Lougheed I.
Almost every time I drive into the mountains on the TransCanada Highway, just before passing Dead Man’s Flat, I look up at the characteristic folded strata that grace the summit tower of Lougheed. Now, I was finally standing up here looking down – and this isn’t even the main summit! Vern had done the true summit of Mount Lougheed before on a separate occasion (but honestly, which mountain hasn’t he climbed!?!) and described it as an enjoyable moderate scramble from the next valley over, so that’s definitely on my list now for a future trip. The true summit can also be reached from Lougheed I of course (as per Nugara’s Lougheed Traverse), but that is a difficult climber’s scramble and takes significantly more time to complete. Looking over at the route from here, I can only say it looks quite intimidating! As with the cruxes we encountered today, however, things probably look more manageable as you get closer and “put your nose into the rock”.
It was windy and uncomfortably cold up here, so despite the gorgeous vistas we didn’t want to hang around too long. A lone, brave scrambler who wanted to do the traverse solo crossed our path as we descended – good for him, it takes some guts (not to mention lots of experience and optimum conditions) to do this alone.
One of the things I truly appreciate about having company while out on a trip is the positive energy and mutual encouragement you can get from your climbing partner if your interests and expectations are aligned. It also makes the challenges you encounter on a mountain easier and more enjoyable to tackle. Downclimbing the two cruxes solo, for example, would probably take some considerable mental energy out of anyone, but having someone as easy-going and motivating as Vern on your team surely made it easier than expected and actually a lot of fun!
Once past the crux and back down in the basin, we decided to switch things up a bit and try something different. Instead of retracing our ascent route back along the stair-step drainage into the forest, we headed straight down the middle of the basin to see if we could simply follow the main creek down. With the exception of one short bushy section that required a bypass on faint but surprisingly decent game/scrambler trails on the left (south) side of the creek, it all worked out pretty well. The boulder hopping in the creek was a welcome change to the forest slog in the morning and time just flew as we were chatting away. Lower down we went back up the northern embankment where grassy patches and widely spaced trees made the hiking more convenient. Before we knew it we were back at the car exactly 7 hours after starting out.
Lougheed I packs a punch, but it’s entertaining, scenic and challenging at the same time. The terrain is varied and so are the challenges. What a great return for the effort!
See Vern’s excellent account of our trip here.
DISCLAIMER: Use at your own risk for general guidance only! Do not follow this GPX track blindly but use your own judgement in assessing terrain and choosing the safest route.
Tramping up the easy stair-case gully as we emerge from the trees.
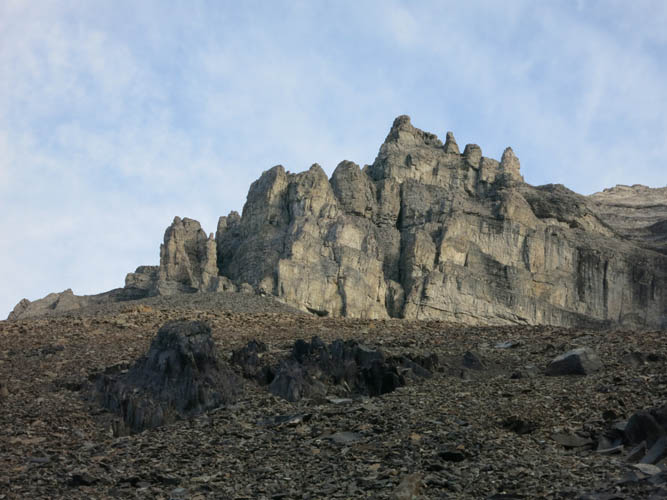
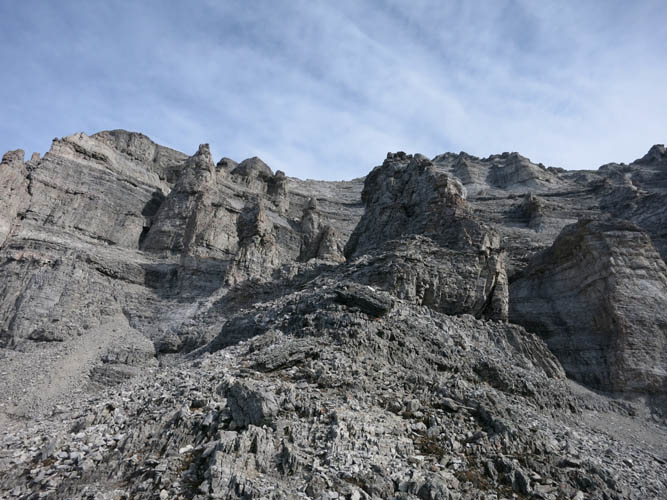
Entering a wondrous world of crags and pinnacles.
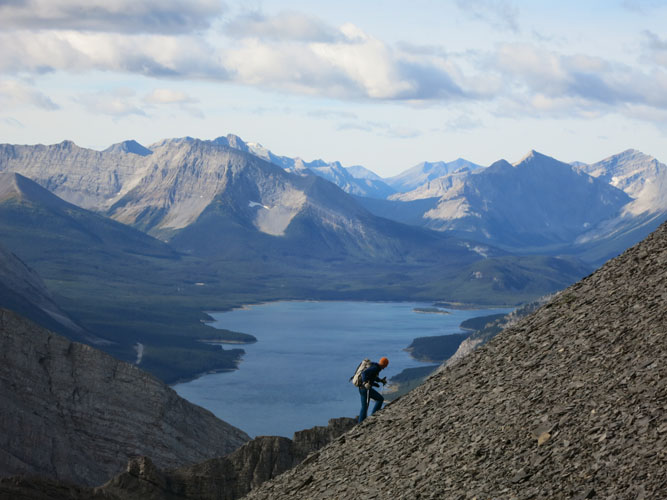
Vern slogging up the SW ridge with Spray Lake behind.
We turn frequently during our ascent to enjoy the beautiful views of Spray Lake behind us. The small peak with the vertical cliffs in the foreground is Little Lougheed, a short and fun hike accessed from the west side. To the right is Mount Nestor.

Vern coming up the SW ridge.
All the hands-on scrambling starts near the pinnacles.
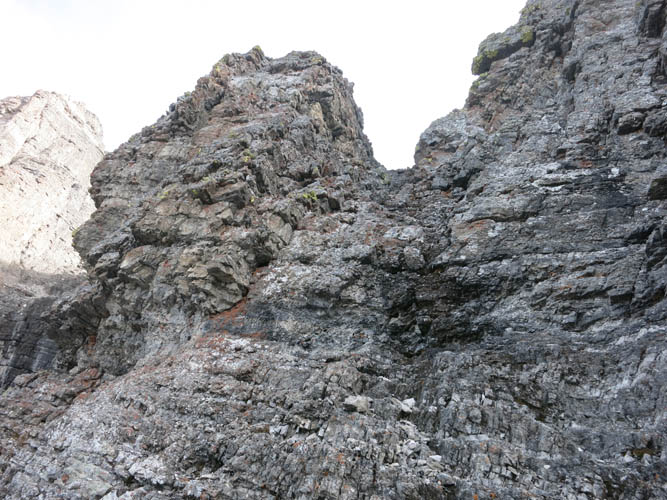
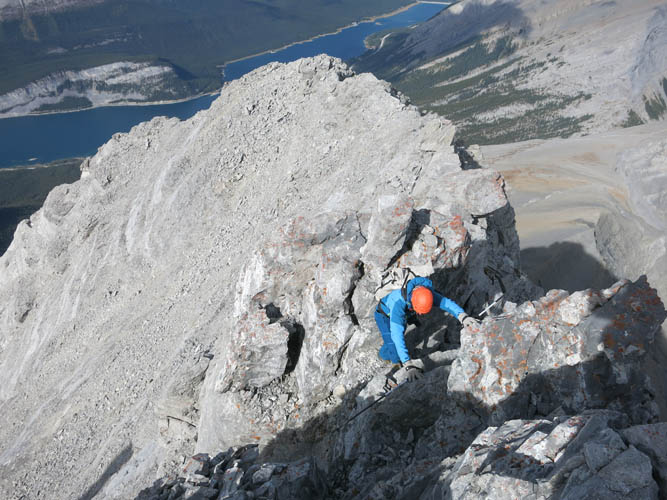
The crux: straight up and through the v-shaped gully in the middle.
The crux with Vern for scale (photo taken on descent).
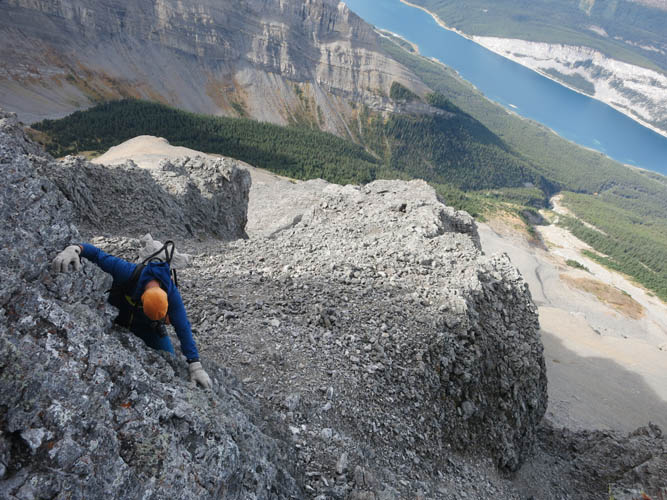
It’s near-vertical, but the holds are great and there are lots of them.
More awesome terrain awaits.

Taking in the views!
The upper bowl. Lots of slabs and rubble here. We stuck more or less to the middle and then aimed diagonally up and left.
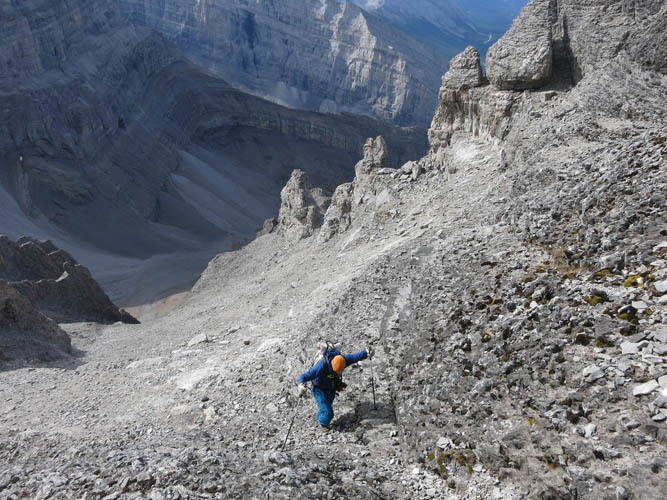
In the upper bowl.
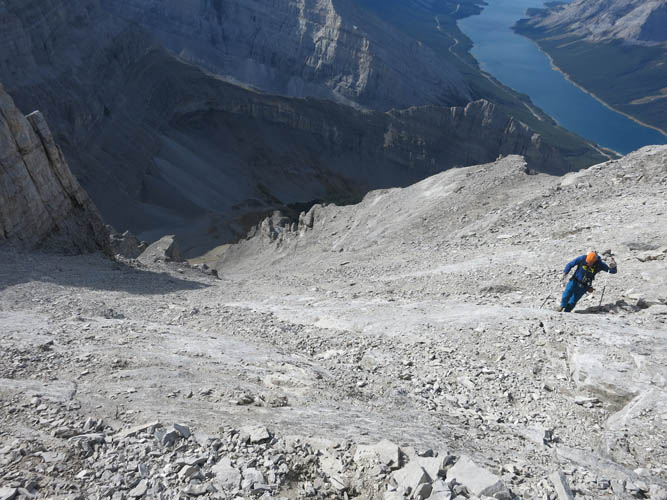
It’s quite steep in places with risk of rockfall.
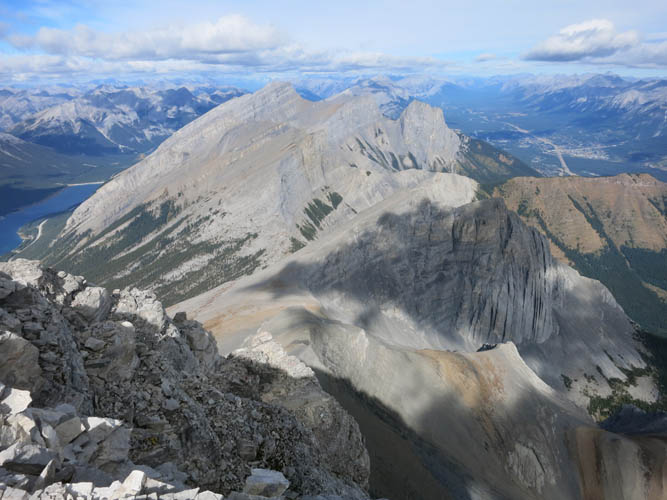
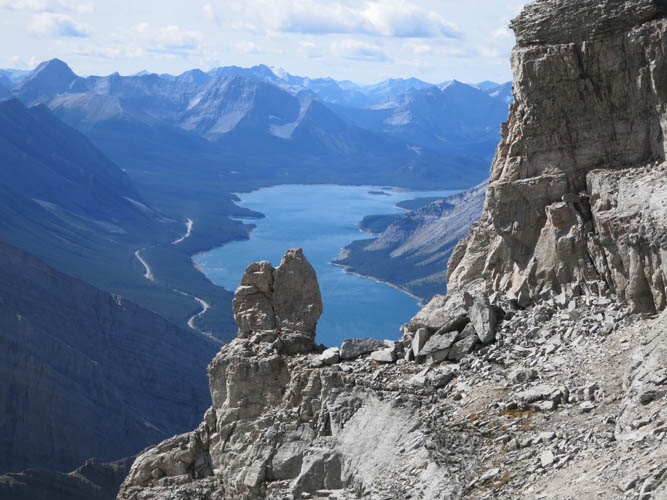
On the west ridge, looking over to the Three Sisters.
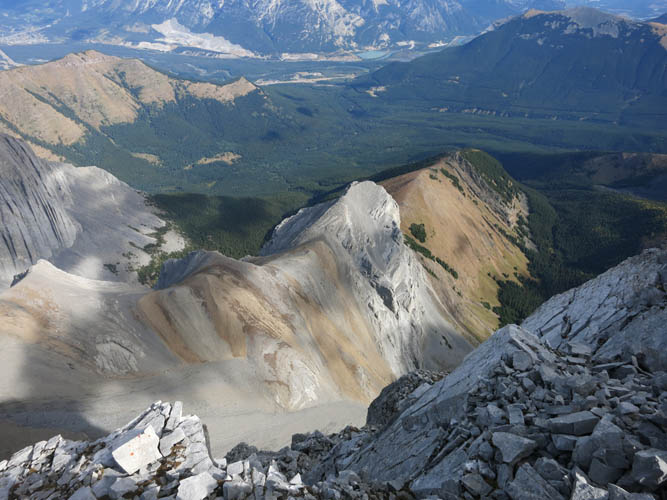
An unnamed ridge that sits between Wind Ridge (upper left) and “No Name Ridge” (to the right out of field of view).
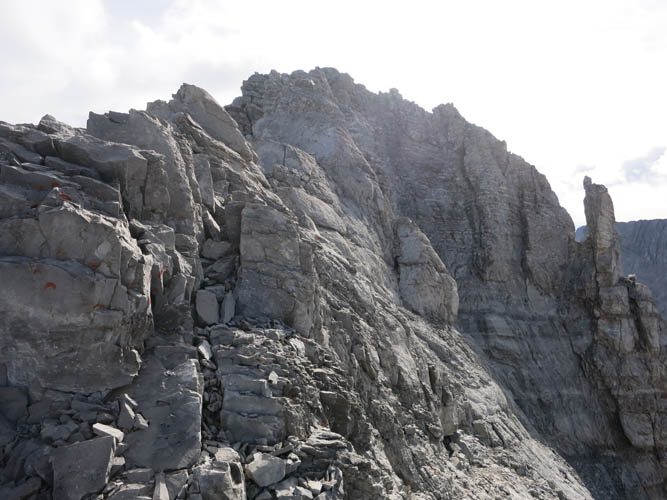
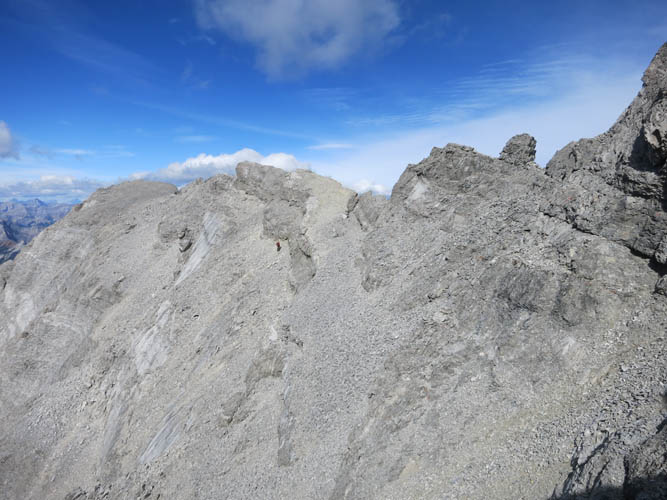
The craggy west ridge.
The exposure is significant in some places along the ridge.
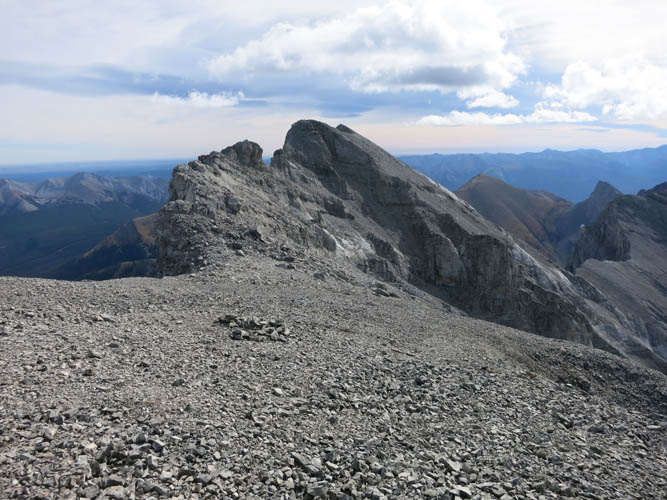
Looking over to the summit of Lougheed I from a sub-peak.

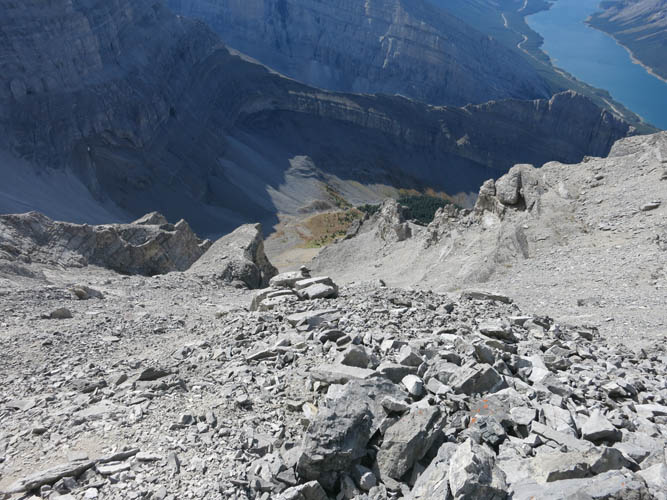
The north face of Lougheed is a sheer vertical drop.
The traverse to Lougheed II (the true summit of Mount Lougheed) is supposed to be a notch or two more difficult.
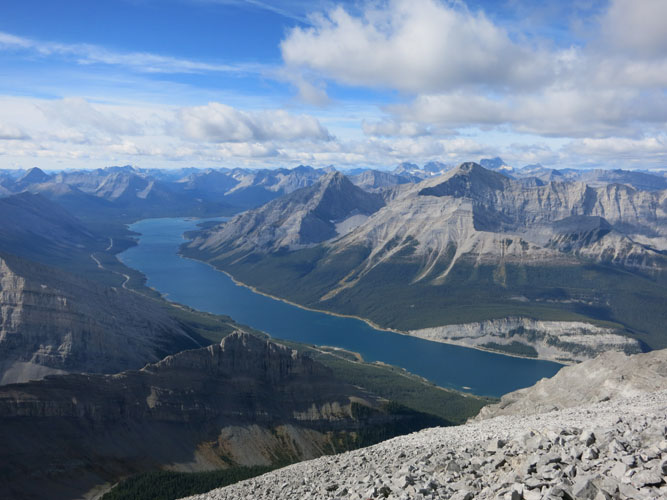
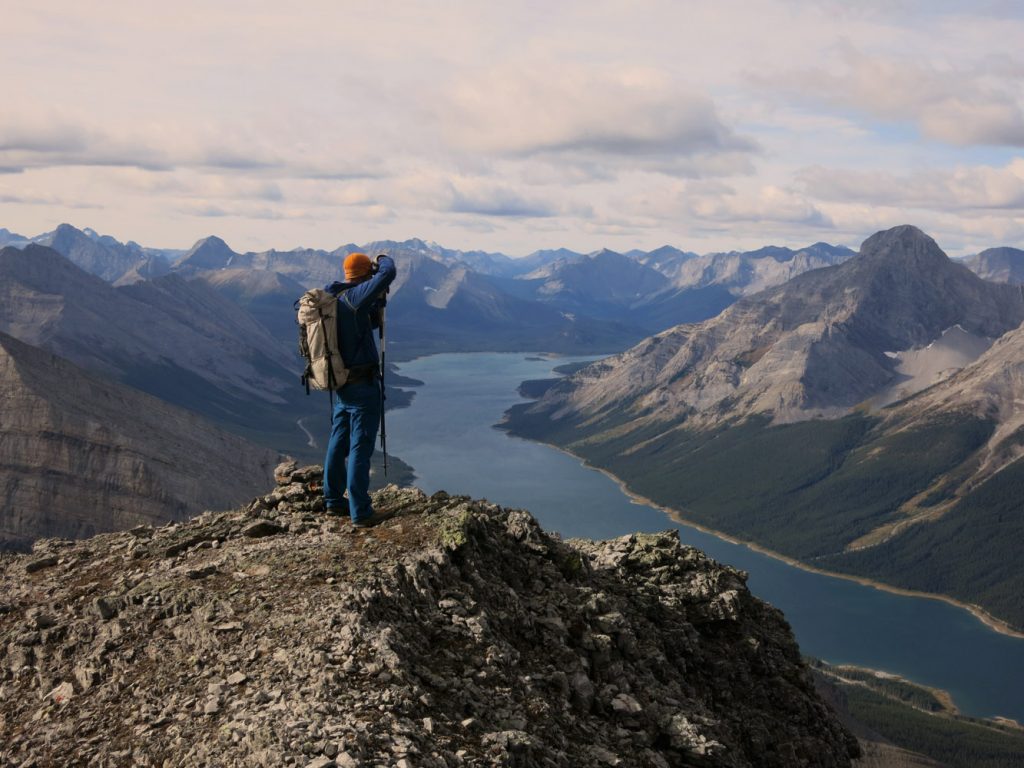
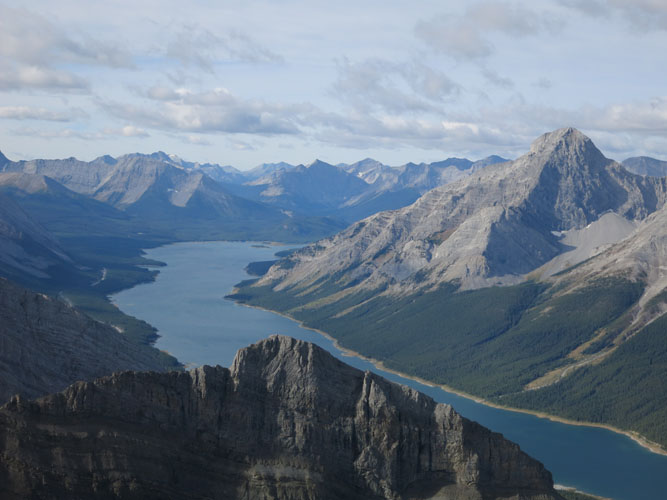
Classic views of Spray Lake.
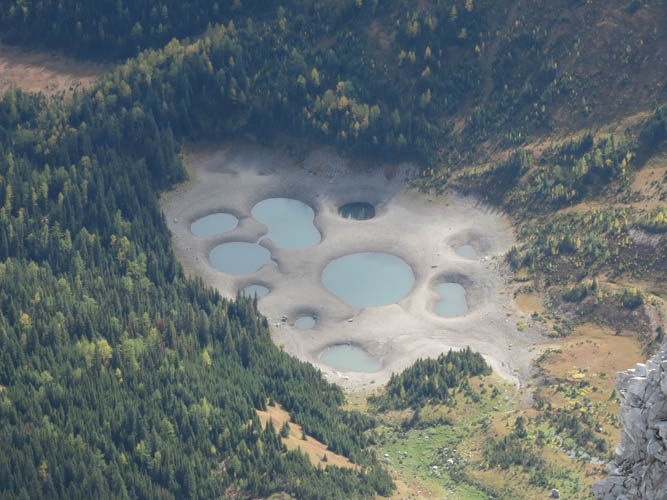
Down below us to the east are these little circular lakes – collectively known as East Wind Pond.
During our return, we bump into a lone scrambler along the ridge – that tiny speck of colour just left of centre.
Back down into the upper bowl.
Pinnacles line the SW ridge.
From the alpine basin, it’s a pleasant hike down the main creek.
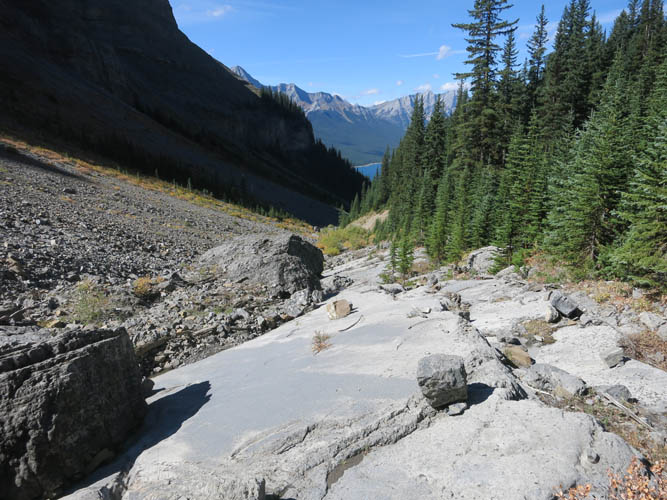
Walking over smooth rock slabs formed by bedding planes.
A look back at the valley: the majestic Mount Lougheed calls for another visit, next time it will be to the true summit!